-1.png?width=5230&height=1198&name=unnamed%20(4)-1.png "Wayne Stiles")

I use Evernote to help organize my piles of papers and files at work and home. From bills to blogs, from songbooks to sermons, from cards to conference notes, Evernote has helped me go virtually paperless.

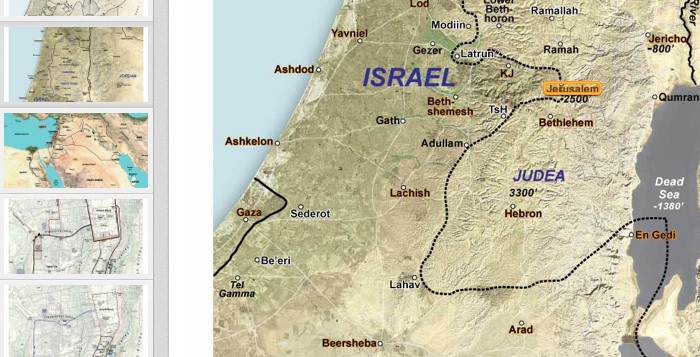
(Maps courtesy of Satellite Bible Atlas)
Of course, the greatest benefit of this application is its ability to find what I stick in there. It has become my digital brain—with the added benefit that it never forgets.
Because of Evernote’s optical character recognition (OCR), I can find words I’m searching for in handwritten notes and even in photographs. Any word in any picture—I can find with a few clicks on my computer or iPhone.
This provides a nice benefit for Bible study.
I’d like to show you how to use Evernote to search your Bible Atlas.
How to Use Evernote to Search Your Bible Atlas
These 6 steps will walk you through the process. Once you’re set up, you’re good to go for life.
1. Locate the digital files for your atlas.
Many new atlases today come with digital maps—either on an accompanying CD/DVD or available via digital download. For this example, I’ll use the excellent digital maps I downloaded from my Satellite Bible Atlas.
By the way, if your favorite Bible atlas doesn’t have digital maps, don’t worry. You can still digitize them.
- Just take your atlas (or buy an extra copy) to your local office supply store and have them cut off the spine. That’s right, just cut it off.
- Scan the pages into digital files. A number of scanners make this easy, for example the ScanSnap S1300i works great. If you want to go paperless, a scanner like this is a great investment.
- You might also get the office store to three-hole punch your pages so you can keep your atlas in a notebook. Or, again, just buy a second copy of your atlas.
You can even do this from within Evernote. Right-click on the image and select “Open,” and the image will open in your default image viewer. Any change you make to an image you’ve opened from Evernote will be saved in Evernote when you quit the image viewer application.
2. Upload your digital maps to Evernote.
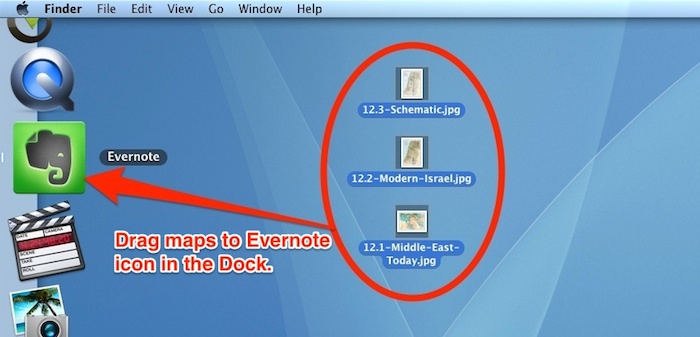
You can easily add your maps to Evernote from your desktop. There are a number of ways to add content in Mac OS X and Windows. My favorite way in the Mac platform is simple:
- Select the maps and drag them onto the Evernote icon in the Dock.
- Evernote opens with each map as a new note in your default notebook. Sweet!
- In the screen shot below, I’ve selected only 3 maps to illustrate. But it works as well with 80 maps.
 If you don’t already use Evernote, obviously you’ll need to download it first. What’s nice is that you can get a whole month of Evernote Premium FREE
as my guest. (You’ll need it to search your maps.) That’s plenty of time to decide if it’s something you’ll use and enjoy (and I think you will). I use Evernote to store pretty much everything—and it’s very secure.
If you don’t already use Evernote, obviously you’ll need to download it first. What’s nice is that you can get a whole month of Evernote Premium FREE
as my guest. (You’ll need it to search your maps.) That’s plenty of time to decide if it’s something you’ll use and enjoy (and I think you will). I use Evernote to store pretty much everything—and it’s very secure.
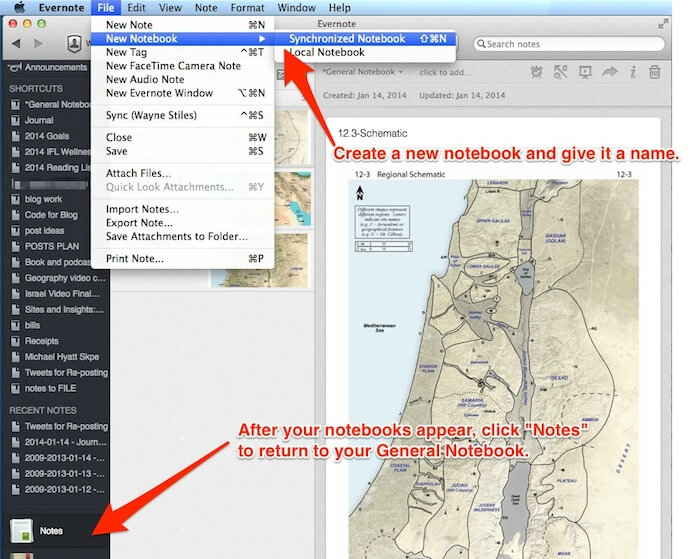
3. Create a notebook for your atlas maps.
After your maps upload to Evernote, you’ll see them listed in your general notebook, something like the picture below (I like the “snippet view”).
- Create a new synchronized notebook, and give it a name—perhaps the name of your atlas, like “Satellite Bible Atlas.”
- Hit return and the notebook finds its alphabetical spot among your other notebooks.
- Return to your general notebook by clicking “Notes.”
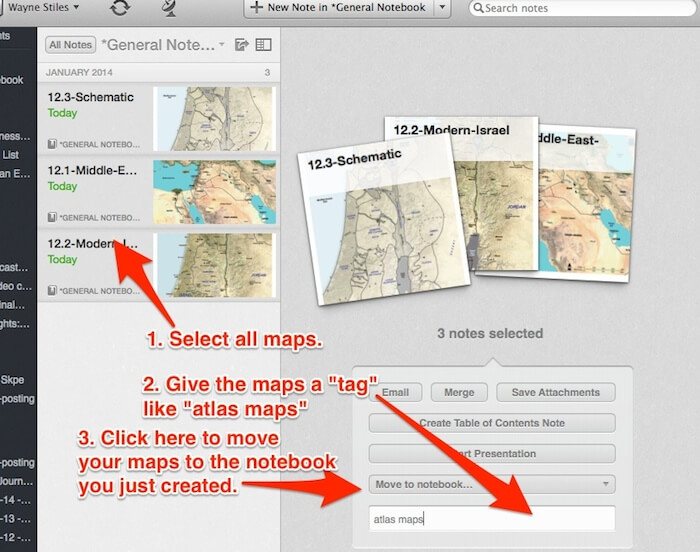
4. Tag your maps and move them to your notebook.
First, select all of your maps, and then “tag” the group with a name. For example, you could tag them “atlas maps.” This tag is necessary when you start to search.
Then—and only then—click the field “Move to notebook” and select the notebook you just created. Your maps automatically file themselves in that notebook.
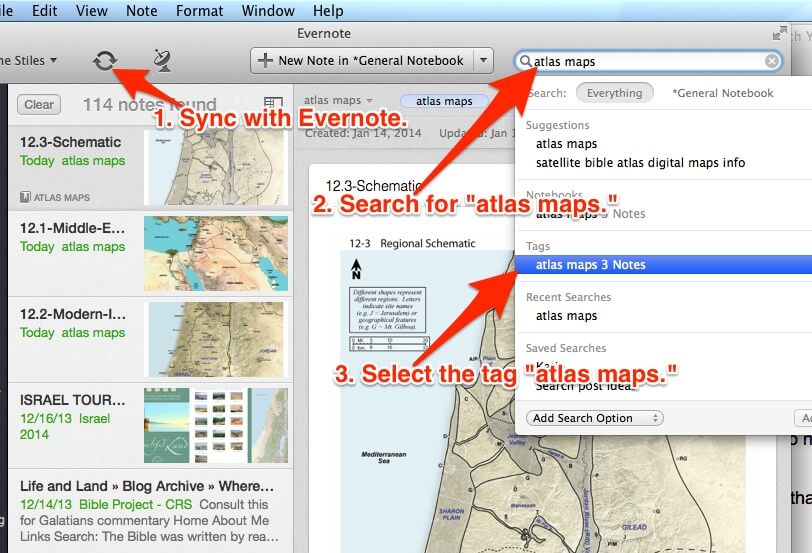
5. Sync and search!
Now the hard work begins to pay off.
- Synchronize your maps with the Evernote servers so the OCR can do its thing (i.e. recognize place names on the maps).
- Click in the search bar for “atlas maps,” and you see stuff other than your maps appear (assuming you have other content in Evernote besides the maps).
- Mouse down and select the tag “atlas maps,” and whala! Only your maps show. You’ll notice in the search field that “TAG atlas maps” appears. Leave it!
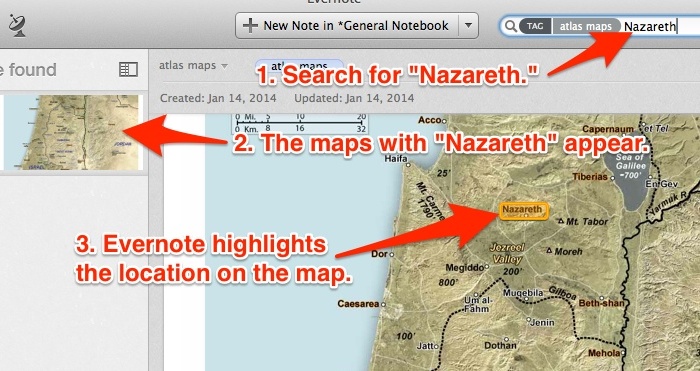
Type in the place name you’re looking for and magically, only the maps with that place name appear.
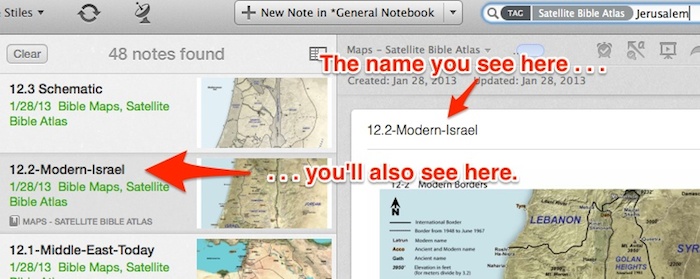
6. Consider renaming your maps.
Some atlases name their digital files after the map numbers in the atlas. While that’s handy for the publisher, it’s not as convenient for us when we’re searching.
Say you’re searching for Jerusalem. You’ll find that on a LOT of your maps. Unless your maps have descriptive names, you’ll have to hunt until you find what you’re looking for.
Taking a few minutes to rename your maps according to period, region, etc., will reward you in the long run.
- To rename a map/note, edit the text where the screen shot below says “The name you see here . . .”
- Once you change the name, you’ll also see the change in the list. Seeing that list in searches will be a help.
One thing I love about this system is that Evernote syncs with all my mobile devices, and I carry my iPad mini with me to church and look at maps there too!
Tell me what you think: What other ways can you think of to use Evernote for Bible study? To leave a comment, just click here.
If you don’t already use Evernote, obviously you’ll need to download it first. What’s nice is that you can get a whole month of Evernote Premium FREE
as my guest. (You’ll need it to search your maps.) That’s plenty of time to decide if it’s something you’ll use and enjoy (and I think you will). I use Evernote to store pretty much everything—and it’s very secure.
Click here to leave a comment.
.jpg?width=350&name=Wayne-books-350wide%20(1).jpg)